Signs Your Sliding Door Rollers Need Attention
Over time, sliding door rollers can develop various issues that hinder their smooth operation. Recognizing these problems early can prevent further damage, reduce repair costs, and ensure your door functions efficiently. Here are some common warning signs that your sliding door rollers may need maintenance or replacement:
1. Difficulty in Sliding
If your sliding door requires extra force to open or close, the rollers may be dirty, worn out, or damaged. Built-up debris, rust, or a lack of lubrication can cause friction, making movement more difficult.
2. Unusual Noises
Squeaking, grinding, or rattling sounds when moving the door are strong indicators of roller wear or insufficient lubrication. These noises suggest that the rollers may be deteriorating and need immediate attention.
3. Door Sticking or Jamming
A sliding door that sticks at certain points or refuses to glide smoothly could be the result of misaligned rollers, track obstructions, or accumulated dirt and grime. If left unchecked, this can cause further damage to both the rollers and the track.
4. Visible Damage
Take a closer look at the bottom of the door. If you notice cracked, chipped, or flattened rollers, they are likely beyond repair and need to be replaced. Damaged rollers can also lead to increased strain on the door track.
5. Misalignment
If your sliding door appears crooked, uneven, or doesn’t sit flush within the frame, misaligned rollers may be to blame. This issue can cause further operational problems, including uneven weight distribution and premature roller wear.
Prevention & Maintenance
Regular cleaning and lubrication of the rollers and tracks can extend their lifespan. Removing dirt, dust, and debris while ensuring smooth movement with a silicone-based lubricant can prevent many common issues. Additionally, periodic inspections will help catch early signs of wear and tear before they escalate into costly repairs.
Pro Tip:
To test if your sliding door rollers are the problem, lift the door slightly while trying to slide it. If the movement improves when the weight is lifted, the rollers are likely worn out and need replacing. Also, consider upgrading to stainless steel or nylon rollers for increased durability and smoother operation.
Materials and Tools Needed:
- Flat-head and Phillips screwdrivers
- Putty knife or pry bar
- Replacement rollers (ensure they match your door’s specifications)
- Measuring tape
- Lubricant (silicone-based is recommended)
- Soft cloth
Step 1: Remove the Sliding Door
1. Inspect the Door
Before attempting to remove the door, examine both the top and bottom tracks. Look for screws, brackets, or other fasteners that may be securing the door in place. If any are present, remove or loosen them as needed.
2. Adjust the Rollers
Most sliding doors have roller adjustment screws located at the base or side of the door. Using a Phillips or flathead screwdriver, turn these screws counterclockwise to retract the rollers fully into the door. This lowers the door slightly, creating more clearance and making removal easier.
3. Lift and Remove the Door
Since sliding doors can be heavy and fragile, enlist a partner for assistance. Carefully lift the door upward into the top track, allowing the bottom edge to clear the lower track. Once it’s free, tilt the bottom outward and gently lower the door to remove it from the frame. Be cautious to avoid damaging the door or surrounding surfaces.
Pro Tip:
Place a soft blanket or padding on the floor before removing the door to prevent scratches or damage when setting it down. If the door feels stuck, try wiggling it gently side to side while lifting—it may be lodged due to dirt buildup or misalignment.
Step 2: Access and Remove the Old Rollers
1. Lay the Door Flat
Carefully place the removed door on a soft, non-abrasive surface such as a padded workbench, a blanket, or a drop cloth. This helps prevent scratches and damage to both the glass and the frame.
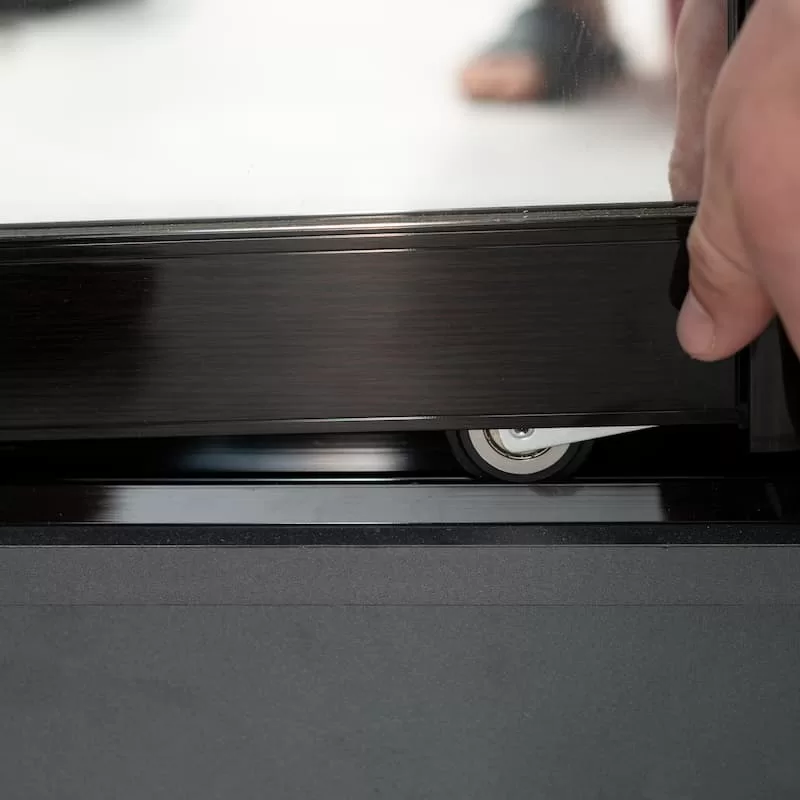
2. Locate the Roller Assemblies
The roller assemblies are typically located at both bottom corners of the door. Some may be recessed slightly into the frame, making them less visible at first glance.
3. Remove the Rollers
- Using a screwdriver, unscrew the fasteners holding the roller assemblies in place.
- If the rollers seem stuck, wiggle them gently while loosening the screws.
- Once loosened, carefully pry the rollers out using a putty knife or pry bar. Be cautious not to bend or damage the door frame in the process.
Pro Tip:
Before installing new rollers, clean out the roller slots using a vacuum or brush to remove dirt, dust, and debris. This prevents future issues and ensures the new rollers fit and function smoothly. Additionally, take a picture of the existing roller assembly before removing it—this can help ensure you install the replacements correctly.
Step 3: Install the New Rollers
1. Select the Right Replacement Rollers
Before installation, ensure the new rollers match the old ones in size, design, and material. Check the wheel diameter, housing type, and mounting holes to ensure a proper fit. If upgrading, consider stainless steel or nylon rollers for better durability and smoother operation. Check out our sliding door rollers shop and find the rollers that you need.
Find the perfect replacement rollers for your sliding door! Browse our wide selection of high-quality rollers designed for smooth, effortless operation. Whether you’re looking for a direct replacement or an upgrade, we’ve got you covered. Shop Now.
2. Insert and Secure the New Rollers
- Align the new roller assemblies with the slots where the old ones were removed.
- Gently slide them into place, making sure they sit evenly within the frame.
- Using a screwdriver, tighten the screws just enough to hold the rollers securely—avoid overtightening, as this can restrict movement.
3. Test the Rollers
- Manually spin each roller to ensure they move smoothly and freely.
- If they feel stiff or uneven, slightly loosen the screws and test again.
- Adjust the roller height if needed, following manufacturer recommendations.
Pro Tip:
Before reinstalling the door, apply a small amount of silicone-based lubricant to the rollers. This reduces friction, extends their lifespan, and ensures effortless sliding. Avoid oil-based lubricants, as they can attract dirt and debris over time.
Step 4: Clean and Prepare the Tracks
1. Remove Dirt and Debris
Over time, dust, dirt, and grime accumulate in the tracks, making it harder for the door to glide smoothly. To ensure optimal performance:
- Use a vacuum cleaner with a narrow nozzle attachment to remove loose debris.
- For stuck-on dirt, use a stiff brush or old toothbrush to scrub the grooves.
- Wipe down the tracks with a damp microfiber cloth to remove any remaining residue.
2. Deep Clean for Stubborn Build-Up
If there’s built-up grime or hardened debris:
- Mix warm water with mild dish soap and scrub the tracks using a sponge or brush.
- For tougher dirt, a 50/50 vinegar and water solution can help dissolve buildup.
- Dry the tracks thoroughly with a clean towel to prevent moisture-related damage.
3. Lubricate for Smooth Operation
Once the tracks are completely dry, apply a thin layer of silicone-based lubricant along the inner edges where the rollers make contact. This helps:
- Reduce friction, allowing for effortless sliding.
- Prevent wear and tear on both the rollers and tracks.
- Repel dust and dirt buildup better than oil-based lubricants, which can attract grime.
Pro Tip:
For long-term maintenance, place a thin strip of weatherproof tape (such as Teflon tape) along the track’s base to reduce direct metal-to-metal contact. This minimizes friction and extends the lifespan of both the tracks and rollers.
Step 5: Reinstall the Sliding Door
1. Position the Door
With the help of a partner, carefully lift the door, aligning the top edge into the upper track first. Tilt it slightly to ensure it clears the frame without force.
2. Set the Bottom in Place
Once the top is secure in the track, tilt the bottom inward and gently lower it onto the bottom track. Ensure the rollers sit properly within the track grooves. If the door resists settling into place, double-check for obstructions or misalignment.
3. Adjust the Rollers for Proper Alignment
- Locate the roller adjustment screws (typically at the base or sides of the door).
- Using a screwdriver, turn the screws clockwise to lower the rollers and raise the door. This ensures a snug fit within the frame and prevents dragging.
- Adjust both sides evenly to ensure the door sits level and glides smoothly.
4. Test the Door’s Movement
Gently slide the door open and closed several times to confirm it moves effortlessly without sticking or wobbling. If needed, fine-tune the roller height for optimal balance.
Pro Tip:
After installation, check the door’s locking mechanism to ensure it engages properly. If the lock doesn’t align, fine-tune the roller height adjustments until the latch clicks securely into place. A properly aligned door improves both security and insulation.
Final Thoughts
Regular maintenance of your sliding door—including cleaning the tracks, lubricating moving parts, and inspecting the rollers for wear—can significantly extend its lifespan and ensure smooth operation. A well-maintained door enhances both convenience and home security.
However, if you experience difficulty removing or reinstalling the door, persistent sticking, misalignment, or damaged rollers, it’s best to seek expert assistance. For professional and reliable sliding door repair in Toronto, contact the specialists at Enlive Doors at (647) 371-5756. Their experienced team can quickly diagnose and resolve any issues, ensuring your door functions like new.
Don’t let a stubborn sliding door disrupt your daily routine—call Enlive Doors today for expert service!

