How to Choose the Right Door Closer for Your Garage Door
When selecting a door closer for your garage door, it’s important to consider both safety and performance. Start by checking the grade rating—Grade 1 closers are the most durable and often recommended for high-traffic or heavy doors, while Grade 2 or 3 may be suitable for lighter, residential use. Look for a closer that supports adjustable closing and latching speeds, especially since garage doors typically need a firm latch to meet fire safety standards. Size and weight compatibility are key—most models include a guide that matches closer strength to door width and weight. Finally, opt for a closer with a backcheck feature if you want to prevent the door from opening too forcefully in windy conditions, which is especially useful for doors leading to the outdoors or an unsealed garage. If in doubt, choose a model that complies with your local building code requirements to avoid safety violations.
Understanding Fire Safety Requirements for Attached Garages in Ontario
In Ontario, ensuring proper fire safety measures for attached garages is crucial to protect your home and comply with local building codes. The Ontario Building Code mandates that any door connecting an attached garage to the house must be equipped with a self-closing device, such as an automatic door closer. This requirement is designed to prevent the spread of fire and harmful gases, like carbon monoxide, from the garage into the living areas. Additionally, the door itself should be fire-rated, typically with a minimum 20-minute fire-resistance rating, and must not have any direct openings into rooms used for sleeping.
Beyond the door specifications, the walls and ceilings separating the garage from the residence should have appropriate fire-resistant materials, often requiring a minimum ½-inch gypsum board or equivalent. These barriers help contain potential fires within the garage, providing occupants with more time to evacuate and minimizing property damage. Regular maintenance, such as checking the functionality of door closers and ensuring seals are intact, is essential to uphold these safety standards. Homeowners should consult the latest Ontario Building Code or a qualified professional to ensure full compliance with all fire safety regulations for attached garages.
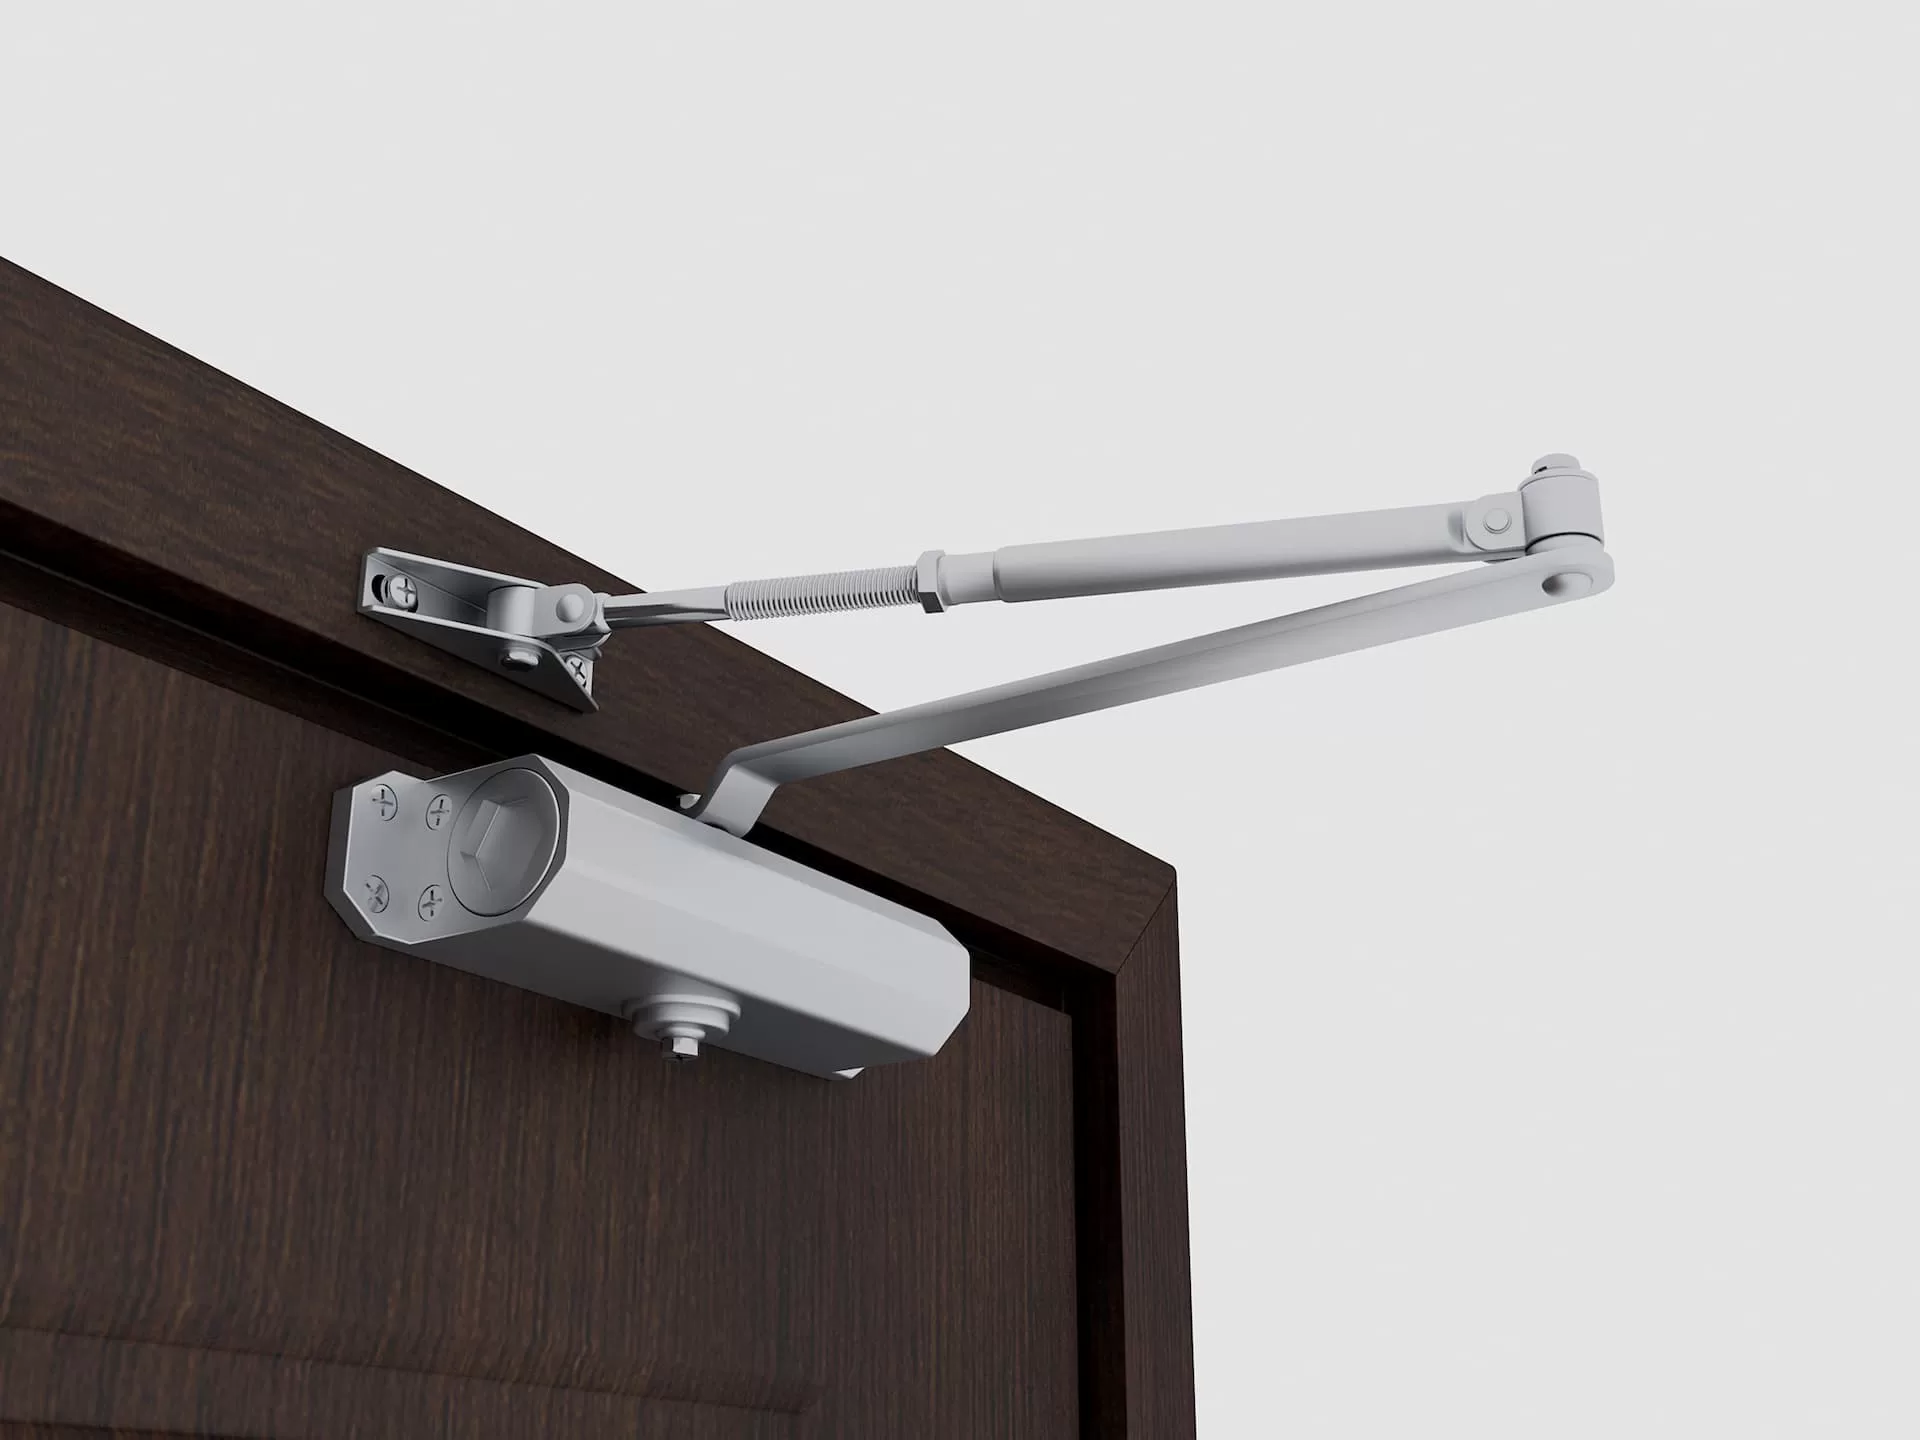
Installation Instructions
What You’ll Need:
- A door closer kit
- Drill and bits
- Screwdriver
- Measuring tape
- Pencil or marker
- Masking tape
- Ladder (optional)
- Patience (seriously!)
Step 1: Read the Instructions (Yes, Really)
Before doing anything, take the time to carefully read through the instruction manual. Some import models can be confusing or poorly translated, so highlight the key sections relevant to your specific model.
Pro Tip:
Double-check the model number printed on your closer body—it may not match the box or instructions. If it doesn’t match, use the measurements for the model that does match the actual part.
Step 2: Mark the Mounting Holes (Using Masking Tape)
Place masking tape on the door where the closer body will be installed. This gives you a safe surface to make alignment marks without damaging the door. You can reposition or redraw your marks easily before drilling.
Measure carefully and mark the positions for the screws. Install one screw first to hold the closer body in place, then use it as a guide to drill the remaining holes.
Pro Tip:
Use a center punch or nail to lightly dent your drill spots. This prevents the drill bit from wandering, especially on metal doors.
Step 3: Check Orientation
Most closers have adjustment screws that must face the door hinges. Double-check your orientation before fully installing the closer body—this is a common mistake that’s easy to fix early on, but a pain to redo later.
Pro Tip:
Lay all the parts out on the floor first in the orientation you plan to install them. This helps you visualize the whole setup before committing.
Step 4: Install the Closer Body
Once you’re confident in your markings and alignment, go ahead and install the closer body using all screws.
Don’t forget the cap that covers the non-used side—it’s mostly aesthetic, but it gives a cleaner, more finished look.
Step 5: Mark and Attach the Arm to the Door Frame
Use the same masking tape method to mark where the arm will mount to the top of the door frame. Most instructions will call for preloading the closer—this means installing the arm with slight tension already applied. This helps the door shut reliably.
Position the arm so it’s perpendicular to the door frame before fastening.
Pro Tip:
When screwing into the door header, angle the screws upward slightly to give them a stronger bite in the wood.
Step 6: Secure the Arm to the Closer Body
Use the bolt included in your kit to attach the arm to the closer body. Once the arm is locked into position, tighten the nut securely to keep it from coming loose over time.
Pro Tip:
After securing, manually open and close the door a few times to test smooth operation before making final adjustments.
Step 7: Adjust the Closing and Latching Speeds
Most door closers include two small screws for fine-tuning:
- Closing Speed: Controls how fast the door swings closed.
- Latching Speed: Controls the final few inches before the door latches.
Use a screwdriver to adjust these until the door closes gently but fully.
Pro Tip:
If the door slams shut, turn the screw clockwise to slow it down. If it doesn’t latch, turn the latching screw counterclockwise slightly until it does.
Consider Professional Installation from Enlive Doors
While installing a door closer can be a satisfying DIY project, it’s not always straightforward—especially if you’re dealing with heavy doors, unclear instructions, or fire code compliance. For a seamless and code-compliant installation, consider hiring the professionals at Enlive Doors. Their experienced team ensures your garage door closer is installed correctly, functions smoothly, and meets all Ontario building and fire safety standards. Whether you’re upgrading for safety, convenience, or resale value, Enlive Doors takes the guesswork out of the process and delivers peace of mind with every job call us at (647) 371-5756.

